DIY Hair Mask made with 3 natural ingredients…

The Happier Homemaker Hair Mask

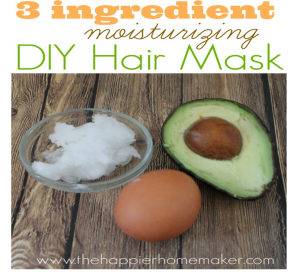
Photo courtesy of the Happier Homemaker

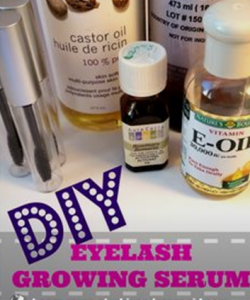
As I mentioned a few weeks ago one of the projects I want to tackle this summer was trying some natural recipes that M. GRACE and I find interesting and hopefully you do as well.  The first tutorial we posted about was the DIY Eyelash Growing Serum from Whipped Green Girl.  Today we are intrigued with the 3 Ingredient Moisturizing DIY Hair Mask from The Happier Homemaker.

I love the personal reason Melissa from The Happier Homemaker mentions for her need to develop this recipe because I too love my hot iron.  Plus she’s right about the wonders and benefits of coconut oil.  This recipe is fantastic because it needs only 3 ingredients and I like things to be as simple as possible.Pure GRACE Soap Hair Mask

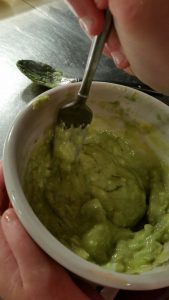
M. GRACE (8) and I made this recipe per the directions.  Actually she did all the mixing including cracking the egg.  She added the coconut oil to the bowl first, then the avocado and mashed them together.  Finally she added the egg and mixed again.  I began to work the mask into M. GRACE’s hair.  Melissa mentioned the coconut oil will warm up in your hands and traditionally this does happen for me but since the egg and avocado were both straight out of the fridge I was having trouble getting the oil to warm and mix into the rest of it.  M. GRACE has pretty short hair for a girl so I worked plenty of mask into her hair and sent her to go look at herself in the mirror.  I wanted to try the mask as well and there was plenty left but first I warmed it in the microwave for about 30 seconds and it was long enough to begin the melting of the coconut oil.  I was able to smooth out the oil and really incorporate it into the mask mixture better than before and it made the process much easier for me.  I had enough mask left to do my whole head of above the shoulder but thick hair.

M. GRACE and I enjoyed wearing this mask for about 15 minutes and then rinsed it out.  She was most thrilled that the water came out green.  Our hair felt great and looked shiny, fuller and softer.  We will probably try this treatment again possibly once every 2 weeks like The Happier Homemaker recommends.  We would definitely recommend this mask to our readers.

If you end up trying this recipe we would love to hear about your experience in the comments.

DIY Eyelash Growing Serum…a natural recipe

Whipped Green Girl Eyelash Growing SerumOne of the projects I want to work on this summer is to begin to provide to you, our readers and clients, some educational tutorials for natural beauty products.  My goal is to choose recipes that are simple and contain basic ingredients most of us either have or can get easily.  And, of course, recipes and tutorials that do not contain chemicals or questionable ingredients.  M. GRACE and I will try to make as many of these as possible and add our thoughts and experience.Whipped Green Girl Eyelash Growing Serum Tubes

The first recipe I want to highlight is one originally posted by Angie at Whipped Green Girl.  Angie teaches us how to make our own Eyelash Growing Serum.  Now I must be honest…a few years ago I actually purchased the name brand of this product that was at the time celebrity endorsed by the beautiful Brooke Shields.  I remember it being more than the $100 dollars Angie mentions.  While it did work well for the time I used it as soon as I stopped using it my eyelashes went right back to their normal length.  And, while I did enjoy the extra length and darker color of the lashes I did wonder exactly what I was applying to the top of my eyelid.

Whipped Green Girl Pure GRACE Soap ContestWhipped Green Girl has posted a very simple recipe to make this product at home along with practical advice and tips.  I love how she details the benefits of each individual oil and includes a link to purchase the possibly hard to find empty mascara tube.  Check out Whipped Green Girl’s tutorial here.  I have yet to try this recipe but if any of you do I would love to hear about your experience in the comments.

Why you are over there check out the review and contest she is offering in conjunction with us.  You could win a goodie bag of soaps and lip chap!

Crafting of a Different Kind…

DSCN0070Today we are crafting of a different kind – the Christmas gift kind!  We are working on making homemade vanilla and planning on using this along with several other “homemade” gifts to give to our family and friends.  We routinely make vanilla for our own personal use.  We make ours in a  750ml size which typically lasts us around a year using it for all of our baking needs. Making homemade vanilla is extremely easy but does take some planning and a few months to “brew”. DSCN0328

In addition to homemade vanilla we also plan to make Limoncello (an Italian lemon liqueur), Boozy Cherry Sauce (do you see a theme here?), cinnamon sugar roasted almonds, graham cracker chocolate toffee and honey almond oat soap.

This recipe is similar to how we make our vanilla.


Homemade Vanilla Extract

Ingredients
3 to 5 vanilla beans
8 ounces alcohol such as vodka, bourbon, brandy, or rum
→ General Rule of Thumb: Use 3 to 5 vanilla beans per 8 ounces of alcohol and multiply accordingly if making more extract.

EquipmentDSCN0068
Cutting board and knife
Clean jar or bottle
New bottle(s) for packaging (optional)
Small funnel (optional)
Coffee filter (optional)

Instructions

  1. Split the vanilla beans: Split each vanilla bean in half lengthwise. If you like, you can leave an inch connected at the end of the bean for an attractive presentation. You can also chop the beans into smaller pieces if necessary to fit in your jar or bottle.
  2. Place the vanilla beans in a jar and cover with alcohol: Place the vanilla beans in a clean jar or bottle. Cover them with alcohol, making sure they are completely submerged. Cover the jar or bottle and give it a good shake.
  3. Infuse for at least one month: Store the jar or bottle of vanilla beans in a cool, dark place for at least one month, shaking it from time to time. Taste the extract and let it infuse longer if you want a stronger flavor.
  4. Strain it if you like: You may wish to remove the vanilla pods and decant the extract into a pretty bottle. The little flecks of seeds can be a nice touch, but if you want a clear extract you can strain them out using a coffee filter.
  5. Or leave the pods in the extract: You can also leave the beans in the alcohol and top off the bottle as you use the extract. Eventually all the flavor will be extracted from the original vanilla beans, so you can periodically add fresh beans as well as leftover pods that you’ve scraped for other recipes.

Uses for spent pods. You can also make good use of the spent vanilla pods by drying them and then making vanilla sugar or flavored salt.
Recipe courtesy of the kitchn
Find it here: http://www.thekitchn.com/how-to-make-homemade-vanilla-extract-cooking-lessons-from-the-kitchn-197785

The Benefits of Homemade Natural Laundry Detergent…

vanillaHomemade Laundry Detergent is very easy to make, economical and can be eco-friendly.  There are several different recipes available on the internet, both liquid and dry formulas.  Pure GRACE Soap makes a dry custom formula for sale online and at craft shows that is all natural and made without chemicals.

Many homemade laundry detergent recipes are easy to make and take few ingredients, most of which you probably have in your home all the time.  The recipe we like to use is based heavily on washing soda, baking soda and citric acid.  Washing soda, also known as sodium carbonate or soda ash, is very similar to baking soda but with a different chemical compound.  It has been used for many years by our mothers and grandmothers to clean clothes and is considered a natural ingredient.  It helps to soften the washing water while removing grease and stains.  Baking soda, sodium bicarbonate, is a wonderful natural cleaning product.  Many people use it exclusively to clean their kitchens and bathrooms (along with vinegar).  In laundry detergent, baking soda quickly dissolves in water, helps to clean stains and does not damage fabrics.   Some people think baking soda possibly helps to neutralize odors and freshen fabrics.  Citric acid is included in our recipe because it helps to break down enzymes found in common stains.  Many recipes will call for a ratio of 4 parts washing soda to 1 part citric acid.  That ratio helps you get the cleaning power but does not allow sediment to build up.  Citric acid is also functional as a natural stain remover. Pure GRACE Soap Laundry Detergent

In addition to washing soda, baking soda and citric acid we use a bar of natural soap as the “glue” of the recipe, coarse sea salt and sometimes will include essential or fragrance oils for scent.   We like a high quality bar of natural glycerin soap but about any bar of soap will work keeping in mind some will clean better than others and some contain more questionable ingredients than others.  It is important to hand grate the bar of soap or use a food processor to shred it down until it looks like shredded cheese.  If you use your food processor make sure to rinse any soap residue off before running it through your dishwasher or you will find bubbles on the floor like I did the first time.  The bar of soap helps to hold all of the other ingredients together.  I like to really work it into the dry ingredients so they are thoroughly mixed.  Coarse sea salt helps to soften the washing water but does not aid in the actual cleaning process.  That being said some big name natural detergents on the market do include salt as one of their ingredients.  Essential and fragrance oils can be used to scent the detergent.  We add only a small amount so as not to possibly damage any clothes with an overabundance of oil but scents can be added to your liking or you might choose to leave your detergent unscented.

Laundry Detergent Pure GRACE SoapEach recipe is different but the process to make dry homemade laundry detergent is fairly straight forward and simple.  Place your pre-measured dry ingredients into a bowl.  You may wish to use gloves as washing soda can sometimes irritate sensitive hands.  Mix the dry ingredients well and then add your grated bar of soap.  The bar of soap will be somewhat sticky and should work into the dry mixture well.  I always try to hand mix for a few minutes to make sure the mixture is evenly distributed.  Finally if you choose to add a scent add a few drops of it until you have reached your desired scent.  Packaging your detergent can be fun.  You can use anything from a cute glass jar to a leftover plastic food container.  Dry laundry detergent will last for a long time provided it does not get moisture in it.  The recipe we use sometimes tends to clump since we do not use anti-caking agents, like some commercial brands, therefore we tell our customers to break it up with a spoon or fork if they have clumping.  You can also add a desiccant to help with the moisture.

Homemade laundry detergent is economical, many times costing pennies per load.  Generally speaking all of the ingredients can be found in the laundry aisle of your supermarket or big box home store.  The more “natural” you decide to go with the recipe the more the individual ingredients might cost but keep in mind the batch you are making will last for many loads.  Also many times the amount needed to use in one load of laundry is much smaller than what you would use with a commercial laundry detergent.  The detergent we make and sell uses only one (1) tablespoon per load.  We find it to work as good or better than commercial brands we have used in the past.

The nice thing about making your own laundry detergent is you can control how eco-friendly you would like it to be.  Some ingredients such as Borax, Oxiclean, Fels Naptha, Bleach, etc may or may not be controversial based on the chemicals they include.  Some people feel quite safe using them while others don’t.  It’s a matter of personal preference on what ingredients you want to use in your detergent.  You can make it is eco-friendly as you would like it to be.  Also, we choose to make a dry version of laundry detergent over a liquid form because it will keep longer than some liquid recipes and we do not have to use a preservative, or chemical, to prevent the spread of possible bacteria and mold growth which could be a concern in some liquid recipes.DSCN0485

It is important to note that most homemade laundry detergents are good in both top loader and HE washing machines but always double check if you are concerned.  Many recipes will notate that as well as what water temperatures the detergent performs best in.  Finally if you are interested in continuing your eco-friendly-ness into the world of drying consider using 100% wool dryer balls in place of dryer sheets or fabric softener.  The wool balls will not only stop any static but will help to dry your clothes faster and with less electricity.  They do not have any chemicals associated with them since they are 100% wool.  Products such as homemade laundry detergent and wool dryer balls are economical, easy to make and use, eco-friendly and will go a long way to help winter dry, chapped and sensitive skin.

Below are a couple of basic recipes for making your own laundry detergent.

Homemade Dry Laundry Detergent for Heavy Loads
1 Cup Washing Soda
1 Cup Shredded Soap
¼ Cup Citric Acid
½ Cup Vinegar (added to rinse compartment)
Courtesy of Brambleberry.com
Found here: http://www.soapqueen.com/bath-and-body-tutorials/home-crafts/three-diy-laundry-soap-recipes/

Basic Laundry Powder which works best in warm or hot water.  Use ½ to 1 tablespoon per load.
½ cup soap flakes or grated plain bar soap
½ cup borax
½ cup washing soda
Courtesy of The Nickel Pincher: 3 Easy Homemade Laundry Detergents
Found here: http://www.rodalenews.com/homemade-laundry-detergent